-
[Three.js] 기본 요소 익히기개발공부/Web 2023. 3. 6. 23:06
[인프런 1분코딩님의 강의 <three.js로 시작하는 3D 인터랙티브 웹> 공부 기록입니다.]
기본 요소
비단 Three.js가 아니더라도 3D의 기본 요소에는 다음과 같은 것들이 있다.
Scene
: 장면/무대. 모든 것은 씬 위에 올라간다.
생성
const scene = new THREE.Scene();요소 추가
//mesh 추가
scene.add(mesh);
//camera 추가
scene.add(camera);
//light 추가
scene.add(light);
//...etc
이렇게 생성한 요소들을 씬에 추가하면 된다.
Mesh
: 표현되는 모든 물체. 모양을 나타내는 Geometry와 재질을 나타내는 Material로 구성된다.
const mesh = new THREE.Mesh(geometry, material);두 요소를 파라미터로 넣으면 메쉬를 생성할 수 있다.
Geometry
const geometry = new THREE.BoxGeometry(1, 1, 1);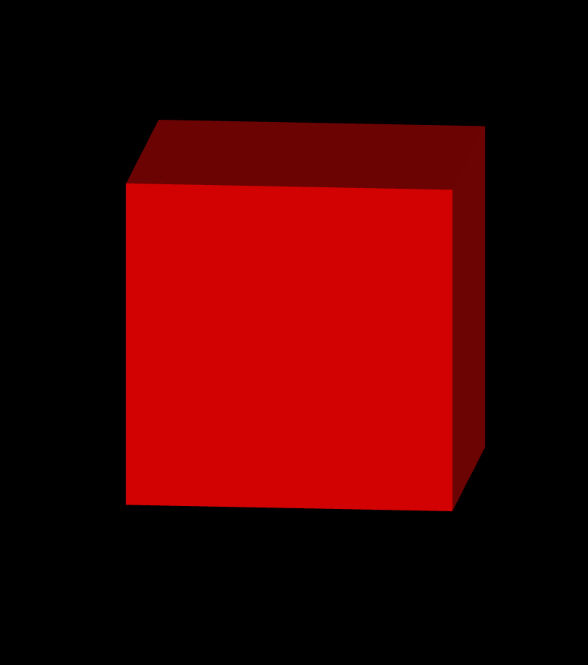
BoxGeometry는 정육면체. 실습에서 사용한 BoxGeometry 말고도 아래처럼 수많은 geometry들이 있다.
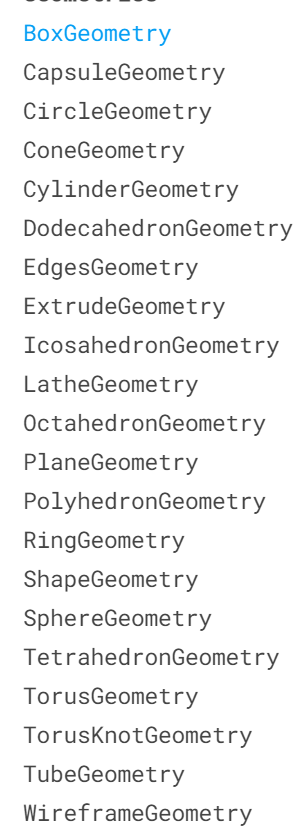
Geometry 종류들 (source: three.js official documentation) Material
const material = new THREE.MeshBasicMaterial({ //빛의 영향 없는 재질
        color: 0xff0000
    });

const material = new THREE.MeshStandardMaterial({
        color: 0xff0000
    });
주석에서 알 수 있듯이 MeshBasicMaterial, MeshStandardMaterial과 같은 다양한 재질을 용도에 맞게 사용하면 된다. 색상도 설정할 수 있다.
Camera
: 시야각(Field of view)에 따라 보이는 모습이 다르다. 두 종류가 있는데, perspective 카메라와 orthographic 카메라이다.
const camera = new THREE.PerspectiveCamera(
        75, //시야각
        window.innerWidth/window.innerHeight, //종횡비 (가로 / 세로)
        0.1, //near
        2000 //far
    );

const camera = new THREE.OrthographicCamera( //원근이 없음.
        -(window.innerWidth / window.innerHeight), //left
        window.innerWidth / window.innerHeight, //right
        1, //top
        -1, //bottom
        0.1, //near
        1000, //far
    );
perspective는 fps 게임을 생각하면 되고, orthographic 카메라는 하데스 같은 isographic(이 용어가 맞는지 모르겠지만) 게임을 생각하면 될 것 같다.
camera.position.x = 1;
camera.position.y = 2;
camera.position.z = 5; //위치
camera.zoom = 0.5; //줌 비율
camera.updateProjectionMatrix(); //카메라 렌더속성 바꿨을때는 이것도 같이 호출해줘야 한다.
camera.lookAt(0, 0, 0) //어딜 바라보는지
이렇게 카메라의 위치를 설정할 수 있고, 줌 비율을 설정할 수 있으며, 바라보는 각도까지 설정할 수 있다. 주의할 점은 그러한 카메라의 속성(줌, 각도)들을 변경할 때마다 updateProjectionMatrix()를 호출해 줘야 변경이 적용된다는 것.
Light
: three.js에서 필수는 아니지만 메쉬의 재질에 따라 중요해질 수도 있다.
const light = new THREE.DirectionalLight(0xFFFFFF, 1);//(빛의 색, 빛의 강도)
light.position.z = 2;
light.position.x = 1;
빛은 위와 같이 생성한다. 빛의 색과 강도를 조절할 수 있으며, position 속성을 이용해 빛이 비치는 위치까지 조정이 가능하다.
Renderer
: 위에서 설명한 모든 것들을 화면에 그려주는 도구이다. 카메라가 보는 바로 그 장면을 그린다.
//스크립트에서 만들기
    const renderer = new THREE.WebGLRenderer();
    renderer.setSize(window.innerWidth, window.innerHeight);
    document.body.appendChild(renderer.domElement);

//html에 넣어놓고 스크립트에서 조작
    const canvas = document.querySelector('#three-canvas');
    const renderer = new THREE.WebGLRenderer({
        canvas,
        antialias: true, //부드럽게 하는 작업. 계단현상 방지. 대신 성능을 좀 요구함.
    });
    renderer.setSize(window.innerWidth, window.innerHeight);
렌더러를 스크립트에서 만들어서 body에 넣으면 자동으로 canvas가 생성되는데, 그냥 html에서 canvas를 생성하고 거기에 렌더러를 추가하는 방법도 가능하다.
const renderer = new THREE.WebGLRenderer({
        canvas,
        antialias: true, //부드럽게 하는 작업. 계단현상 방지. 대신 성능을 좀 요구함.
        alpha: true, //투명하게!
    });

console.log(window.devicePixelRatio); //해당 기기의 픽셀 밀도. 즉 이 값이 2라면 100px 이미지를 표현할 떄 200px 이미지를 압축해서 세밀한 화질 표현을 한다는 것.
renderer.setPixelRatio(window.devicePixelRatio > 1 ? 2 : 1); //2정도만 하면 충분하다.
renderer.setClearColor('#00ff00'); //뒷배경 색 설정
renderer.setClearAlpha(0.5); //불투명도 설정
antialias 속성은 계단현상을 방지하고 외곽선을 부드럽게 하고, alpha 속성은 캔버스의 투명 여부를 결정한다. setClearColor는 렌더러 뒷배경의 색깔, setClearAlpha는 불투명도, setPixelRatio를 이용해서 고해상도 모니터를 대비한 설정도 가능하다.
function setSize() {
        //카메라
        camera.aspect = window.innerWidth / window.innerHeight;
        camera.updateProjectionMatrix();
        renderer.setSize(window.innerWidth, window.innerHeight);
        renderer.render(scene, camera);
    }

    //이벤트(브라우저 사이즈)
    window.addEventListener('resize', setSize);
위 코드는 브라우저 크기 변경에 대비하는 코드이다. window의 resize 이벤트에 맞춰 렌더러의 크기도 변경된다.
renderer.render(scene, camera);마지막으로 render를 이용해 그려주면 위에서 볼 수 있는 빨간 큐브같은 화면이 나온다.
'개발공부 > Web' 카테고리의 다른 글
[Three.js] Transform (0) 2023.03.29 [Three.js] 개발 보조 도구 (0) 2023.03.20 [Three.js] 애니메이션 (0) 2023.03.18 [Three.js] 환경설정/기본 소스 코드 실행 (0) 2023.02.27 [React] google oauth2 연동 (0) 2023.02.27